Attention
This version of Hyperledger Fabric is no longer supported or maintained. You can change the documentation version using the selector at the bottom of the navigation panel.
Using Private Data in Fabric
This tutorial will demonstrate the use of Private Data Collections (PDC) to provide storage and retrieval of private data on the blockchain network for authorized peers of organizations. The collection is specified using a collection definition file containing the policies governing that collection.
The information in this tutorial assumes knowledge of private data stores and their use cases. For more information, check out Private data.
Note
These instructions use the new Fabric chaincode lifecycle introduced in the Fabric v2.0 release. If you would like to use the previous lifecycle model to use private data with chaincode, visit the v1.4 version of the Using Private Data in Fabric tutorial.
The tutorial will take you through the following steps to practice defining, configuring and using private data with Fabric:
This tutorial will deploy the asset transfer private data sample to the Fabric test network to demonstrate how to create, deploy, and use a collection of private data. You should have completed the task Install Samples, Binaries, and Docker Images.
Asset transfer private data sample use case
This sample demonstrates the use of three private data collections, assetCollection, Org1MSPPrivateCollection & Org2MSPPrivateCollection to transfer an asset between Org1 and Org2, using following use case:
A member of Org1 creates a new asset, henceforth referred as owner. The public details of the asset,
including the identity of the owner, are stored in the private data collection named assetCollection. The asset is also created with an appraised
value supplied by the owner. The appraised value is used by each participant to agree to the transfer of the asset, and is only stored in owner organization’s collection. In our case, the initial appraisal value agreed by the owner is stored in the Org1MSPPrivateCollection.
To purchase the asset, the buyer needs to agree to the same appraised value as
the asset owner. In this step, the buyer (a member of Org2) creates an agreement
to trade and agree to an appraisal value using smart contract function 'AgreeToTransfer'.
This value is stored in Org2MSPPrivateCollection collection. Now, the asset
owner can transfer the asset to the buyer using smart contract function 'TransferAsset'.
The 'TransferAsset' function uses the hash on the channel ledger to
confirm that the owner and the buyer have agreed to the same appraised value
before transferring the asset.
Before we go through the transfer scenario, we will discuss how organizations can use private data collections in Fabric.
Build a collection definition JSON file
Before a set of organizations can transact using private data, all organizations on channel need to build a collection definition file that defines the private data collections associated with each chaincode. Data that is stored in a private data collection is only distributed to the peers of certain organizations instead of all members of the channel. The collection definition file describes all of the private data collections that organizations can read and write to from a chaincode.
Each collection is defined by the following properties:
name: Name of the collection.policy: Defines the organization peers allowed to persist the collection data.requiredPeerCount: Number of peers required to disseminate the private data as a condition of the endorsement of the chaincodemaxPeerCount: For data redundancy purposes, the number of other peers that the current endorsing peer will attempt to distribute the data to. If an endorsing peer goes down, these other peers are available at commit time if there are requests to pull the private data.blockToLive: For very sensitive information such as pricing or personal information, this value represents how long the data should live on the private database in terms of blocks. The data will live for this specified number of blocks on the private database and after that it will get purged, making this data obsolete from the network. To keep private data indefinitely, that is, to never purge private data, set theblockToLiveproperty to0.memberOnlyRead: a value oftrueindicates that peers automatically enforce that only clients belonging to one of the collection member organizations are allowed read access to private data.memberOnlyWrite: a value oftrueindicates that peers automatically enforce that only clients belonging to one of the collection member organizations are allowed write access to private data.endorsementPolicy: defines the endorsement policy that needs to be met in order to write to the private data collection. The collection level endorsement policy overrides to chaincode level policy. For more information on building a policy definition refer to the Endorsement policies topic.
The same collection definition file needs to be deployed by all organizations that use the chaincode, even if the organization does not belong to any collections. In addition to the collections that are explicitly defined in a collection file, each organization has access to an implicit collection on their peers that can only be read by their organization. For an example that uses implicit data collections, see the Secured asset transfer in Fabric.
The asset transfer private data example contains a collections_config.json file
that defines three private data collection definitions: assetCollection, Org1MSPPrivateCollection,
and Org2MSPPrivateCollection.
// collections_config.json

[
   {
   "name": "assetCollection",
   "policy": "OR('Org1MSP.member', 'Org2MSP.member')",
   "requiredPeerCount": 1,
   "maxPeerCount": 1,
   "blockToLive":1000000,
   "memberOnlyRead": true,
   "memberOnlyWrite": true
   },
   {
   "name": "Org1MSPPrivateCollection",
   "policy": "OR('Org1MSP.member')",
   "requiredPeerCount": 0,
   "maxPeerCount": 1,
   "blockToLive":3,
   "memberOnlyRead": true,
   "memberOnlyWrite": false,
   "endorsementPolicy": {
       "signaturePolicy": "OR('Org1MSP.member')"
   }
   },
   {
   "name": "Org2MSPPrivateCollection",
   "policy": "OR('Org2MSP.member')",
   "requiredPeerCount": 0,
   "maxPeerCount": 1,
   "blockToLive":3,
   "memberOnlyRead": true,
   "memberOnlyWrite": false,
   "endorsementPolicy": {
       "signaturePolicy": "OR('Org2MSP.member')"
   }
   }
]
The policy property in the assetCollection definition specifies that both
Org1 and Org2 can store the collection on their peers. The memberOnlyRead
and memberOnlyWrite parameters are used to specify that only Org1 and
Org2 clients can read and write to this collection.
The Org1MSPPrivateCollection collection allows only peers of Org1 to have
the private data in their private database, while the Org2MSPPrivateCollection
collection can only be stored by the peers of Org2. The endorsementPolicy parameter
is used to create a collection specific endorsement policy. Each update to
Org1MSPPrivateCollection or Org2MSPPrivateCollection needs to be endorsed
by the organization that stores the collection on their peers. We will see how
these collections are used to transfer the asset in the course of the tutorial.
This collection definition file is deployed when the chaincode definition is committed to the channel using the peer lifecycle chaincode commit command. More details on this process are provided in Section 3 below.
Read and Write private data using chaincode APIs
The next step in understanding how to privatize data on a channel is to build the data definition in the chaincode. The asset transfer private data sample divides the private data into three separate data definitions according to how the data will be accessed.
// Peers in Org1 and Org2 will have this private data in a side database
type Asset struct {
       Type  string `json:"objectType"` //Type is used to distinguish the various types of objects in state database
       ID    string `json:"assetID"`
       Color string `json:"color"`
       Size  int    `json:"size"`
       Owner string `json:"owner"`
}

// AssetPrivateDetails describes details that are private to owners

// Only peers in Org1 will have this private data in a side database
type AssetPrivateDetails struct {
       ID             string `json:"assetID"`
       AppraisedValue int    `json:"appraisedValue"`
}

// Only peers in Org2 will have this private data in a side database
type AssetPrivateDetails struct {
       ID             string `json:"assetID"`
       AppraisedValue int    `json:"appraisedValue"`
}
Specifically, access to the private data will be restricted as follows:
objectType, color, size, and ownerare stored inassetCollectionand hence will be visible to members of the channel per the definition in the collection policy (Org1 and Org2).AppraisedValueof an asset is stored in collectionOrg1MSPPrivateCollectionorOrg2MSPPrivateCollection, depending on the owner of the asset. The value is only accessible to the users who belong to the organization that can store the collection.
All of the data that is created by the asset transfer private data sample smart
contract is stored in PDC. The smart contract uses the Fabric chaincode API
to read and write private data to private data collections using the GetPrivateData()
and PutPrivateData() functions. You can find more information about those functions here.
This private data is stored in private state db on the peer (separate from public state db), and
is disseminated between authorized peers via gossip protocol.
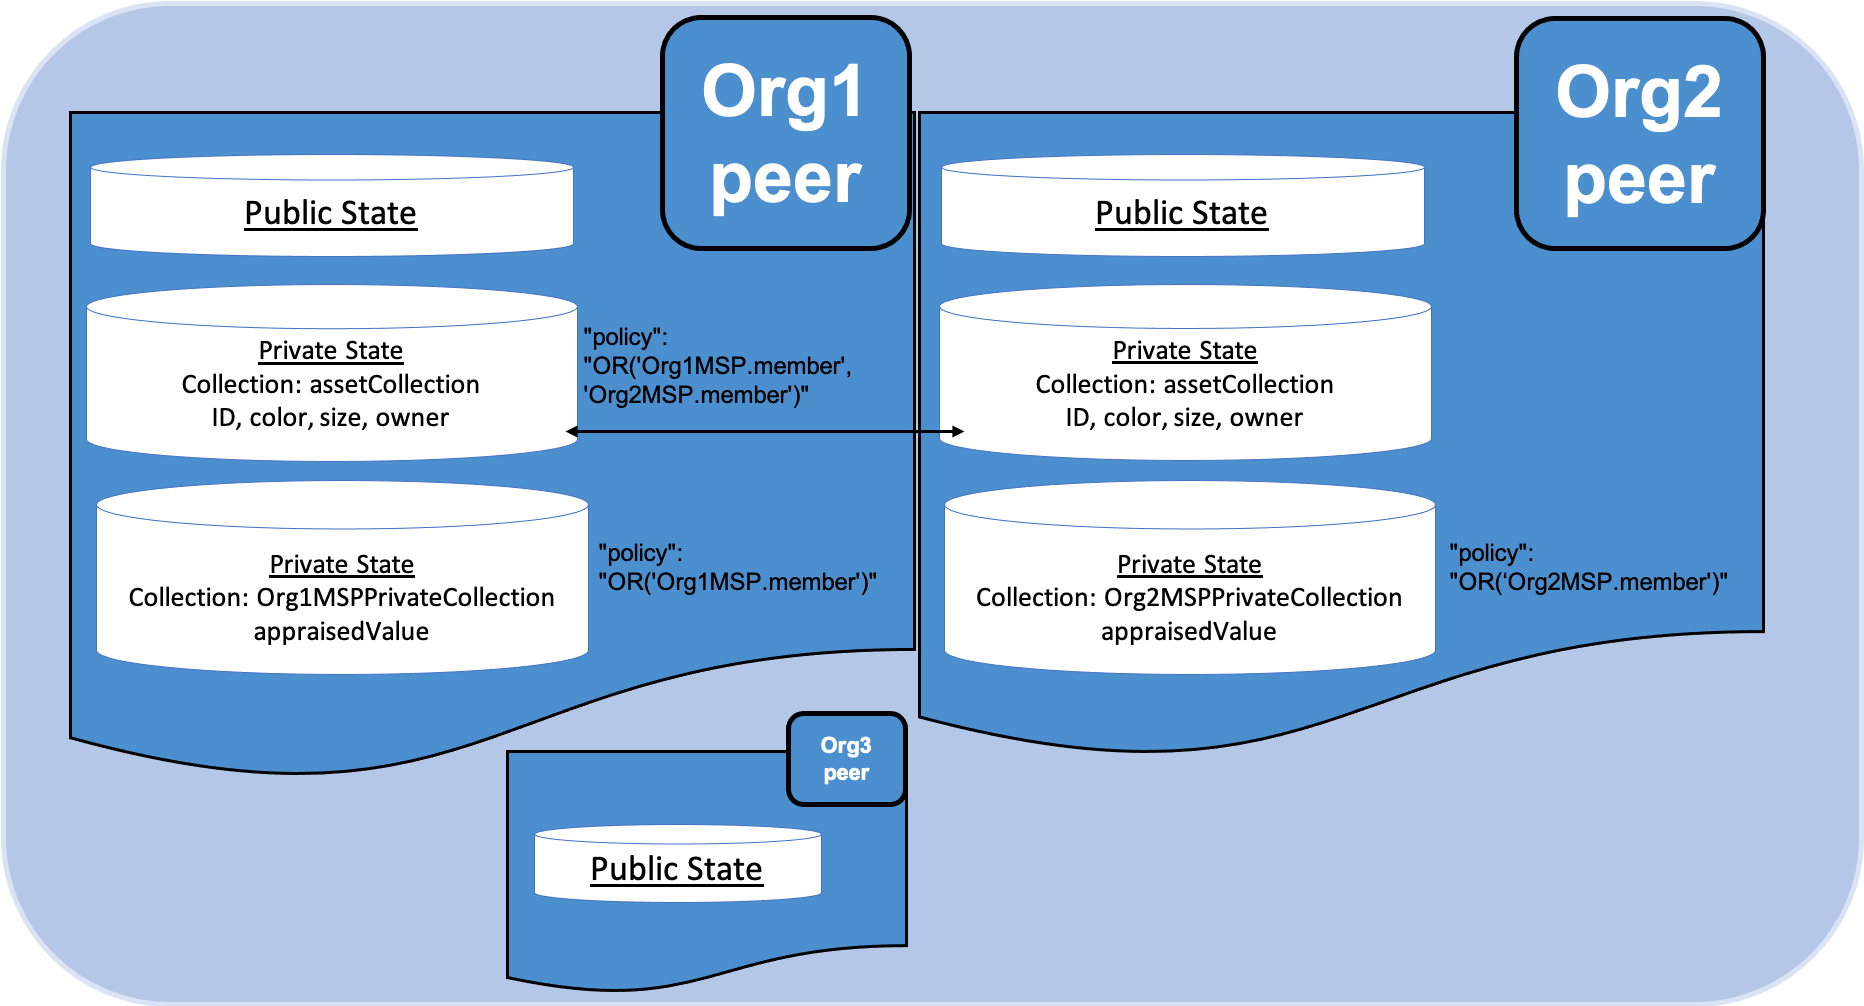
The following diagram illustrates the private data model used by the private data sample. Note that Org3 is only shown in the diagram to illustrate that if there were any other organizations on the channel, they would not have access to any of the private data collections that were defined in the configuration.
Reading collection data
The smart contract uses the chaincode API GetPrivateData() to query private data in the
database. GetPrivateData() takes two arguments, the collection name
and the data key. Recall the collection assetCollection allows peers of
Org1 and Org2 to have the private data in a side database, and the collection
Org1MSPPrivateCollection allows only peers of Org1 to have their
private data in a side database and Org2MSPPrivateCollection allows peers
of Org2 to have their private data in a side database.
For implementation details refer to the following two asset transfer private data functions:
ReadAsset for querying the values of the
assetID, color, size and ownerattributes.ReadAssetPrivateDetails for querying the values of the
appraisedValueattribute.
When we issue the database queries using the peer commands later in this tutorial, we will call these two functions.
Writing private data
The smart contract uses the chaincode API PutPrivateData() to store the private data
into the private database. The API also requires the name of the collection.
Note that the asset transfer private data sample includes three different private data collections, but it is called
twice in the chaincode (in this scenario acting as Org1).
Write the private data
assetID, color, size and ownerusing the collection namedassetCollection.Write the private data
appraisedValueusing the collection namedOrg1MSPPrivateCollection.
If we were acting as Org2, we would replace Org1MSPPrivateCollection with
``Org2MSPPrivateCollection.
For example, in the following snippet of the CreateAsset function,
PutPrivateData() is called twice, once for each set of private data.
// CreateAsset creates a new asset by placing the main asset details in the assetCollection
// that can be read by both organizations. The appraisal value is stored in the owners org specific collection.
func (s *SmartContract) CreateAsset(ctx contractapi.TransactionContextInterface) error {

    // Get new asset from transient map
    transientMap, err := ctx.GetStub().GetTransient()
    if err != nil {
        return fmt.Errorf("error getting transient: %v", err)
    }

    // Asset properties are private, therefore they get passed in transient field, instead of func args
    transientAssetJSON, ok := transientMap["asset_properties"]
    if !ok {
        //log error to stdout
        return fmt.Errorf("asset not found in the transient map input")
    }

    type assetTransientInput struct {
        Type           string `json:"objectType"` //Type is used to distinguish the various types of objects in state database
        ID             string `json:"assetID"`
        Color          string `json:"color"`
        Size           int    `json:"size"`
        AppraisedValue int    `json:"appraisedValue"`
    }

    var assetInput assetTransientInput
    err = json.Unmarshal(transientAssetJSON, &assetInput)
    if err != nil {
        return fmt.Errorf("failed to unmarshal JSON: %v", err)
    }

    if len(assetInput.Type) == 0 {
        return fmt.Errorf("objectType field must be a non-empty string")
    }
    if len(assetInput.ID) == 0 {
        return fmt.Errorf("assetID field must be a non-empty string")
    }
    if len(assetInput.Color) == 0 {
        return fmt.Errorf("color field must be a non-empty string")
    }
    if assetInput.Size <= 0 {
        return fmt.Errorf("size field must be a positive integer")
    }
    if assetInput.AppraisedValue <= 0 {
        return fmt.Errorf("appraisedValue field must be a positive integer")
    }

    // Check if asset already exists
    assetAsBytes, err := ctx.GetStub().GetPrivateData(assetCollection, assetInput.ID)
    if err != nil {
        return fmt.Errorf("failed to get asset: %v", err)
    } else if assetAsBytes != nil {
        fmt.Println("Asset already exists: " + assetInput.ID)
        return fmt.Errorf("this asset already exists: " + assetInput.ID)
    }

    // Get ID of submitting client identity
    clientID, err := submittingClientIdentity(ctx)
    if err != nil {
        return err
    }

    // Verify that the client is submitting request to peer in their organization
    // This is to ensure that a client from another org doesn't attempt to read or
    // write private data from this peer.
    err = verifyClientOrgMatchesPeerOrg(ctx)
    if err != nil {
        return fmt.Errorf("CreateAsset cannot be performed: Error %v", err)
    }

    // Make submitting client the owner
    asset := Asset{
        Type:  assetInput.Type,
        ID:    assetInput.ID,
        Color: assetInput.Color,
        Size:  assetInput.Size,
        Owner: clientID,
    }
    assetJSONasBytes, err := json.Marshal(asset)
    if err != nil {
        return fmt.Errorf("failed to marshal asset into JSON: %v", err)
    }

    // Save asset to private data collection
    // Typical logger, logs to stdout/file in the fabric managed docker container, running this chaincode
    // Look for container name like dev-peer0.org1.example.com-{chaincodename_version}-xyz
    log.Printf("CreateAsset Put: collection %v, ID %v, owner %v", assetCollection, assetInput.ID, clientID)

    err = ctx.GetStub().PutPrivateData(assetCollection, assetInput.ID, assetJSONasBytes)
    if err != nil {
        return fmt.Errorf("failed to put asset into private data collection: %v", err)
    }

    // Save asset details to collection visible to owning organization
    assetPrivateDetails := AssetPrivateDetails{
        ID:             assetInput.ID,
        AppraisedValue: assetInput.AppraisedValue,
    }

    assetPrivateDetailsAsBytes, err := json.Marshal(assetPrivateDetails) // marshal asset details to JSON
    if err != nil {
        return fmt.Errorf("failed to marshal into JSON: %v", err)
    }

    // Get collection name for this organization.
    orgCollection, err := getCollectionName(ctx)
    if err != nil {
        return fmt.Errorf("failed to infer private collection name for the org: %v", err)
    }

    // Put asset appraised value into owners org specific private data collection
    log.Printf("Put: collection %v, ID %v", orgCollection, assetInput.ID)
    err = ctx.GetStub().PutPrivateData(orgCollection, assetInput.ID, assetPrivateDetailsAsBytes)
    if err != nil {
        return fmt.Errorf("failed to put asset private details: %v", err)
    }
    return nil
}
To summarize, the policy definition above for our collections_config.json
allows all peers in Org1 and Org2 to store and transact
with the asset transfer private data assetID, color, size, owner in their
private database. But only peers in Org1 can store and transact with
the appraisedValue key data in the Org1 collection Org1MSPPrivateCollection and only peers
in Org2 can store and transact with the appraisedValue key data in the Org2 collection Org2MSPPrivateCollection.
As an additional data privacy benefit, since a collection is being used, only the private data hashes go through orderer, not the private data itself, keeping private data confidential from orderer.
Start the network
Now we are ready to step through some commands which demonstrate how to use private data.
Try it yourself
Before installing, defining, and using the private data smart contract, we need to start the Fabric test network. For the sake of this tutorial, we want to operate from a known initial state. The following command will kill any active or stale Docker containers and remove previously generated artifacts. Therefore let’s run the following command to clean up any previous environments:
cd fabric-samples/test-network
./network.sh down
From the test-network directory, you can use the following command to start
up the Fabric test network with Certificate Authorities and CouchDB:
./network.sh up createChannel -ca -s couchdb
This command will deploy a Fabric network consisting of a single channel named
mychannel with two organizations (each maintaining one peer node), certificate authorities, and an
ordering service while using CouchDB as the state database. Either LevelDB or
CouchDB may be used with collections. CouchDB was chosen to demonstrate how to
use indexes with private data.
Note
For collections to work, it is important to have cross organizational gossip configured correctly. Refer to our documentation on Gossip data dissemination protocol, paying particular attention to the section on “anchor peers”. Our tutorial does not focus on gossip given it is already configured in the test network, but when configuring a channel, the gossip anchors peers are critical to configure for collections to work properly.
Deploy the private data smart contract to the channel
We can now use the test network script to deploy the smart contract to the channel. Run the following command from the test network directory.
./network.sh deployCC -ccn private -ccp ../asset-transfer-private-data/chaincode-go/ -ccl go -ccep "OR('Org1MSP.peer','Org2MSP.peer')" -cccg ../asset-transfer-private-data/chaincode-go/collections_config.json
Note that we need to pass the path to the private data collection definition file
to the command. As part of deploying the chaincode to the channel, both organizations
on the channel must pass identical private data collection definitions as part
of the Fabric chaincode lifecycle. We are also deploying the smart contract
with a chaincode level endorsement policy of "OR('Org1MSP.peer','Org2MSP.peer')".
This allows Org1 and Org2 to create an asset without receiving an endorsement from
the other organization. You can see the steps required to deploy the chaincode
printed in your logs after you issue the command above.
When both organizations approve the chaincode definition using the
peer lifecycle chaincode approveformyorg
command, the chaincode definition includes the path to the private data collection
definition using the --collections-config flag. You can see the following approveformyorg
command printed in your terminal:
peer lifecycle chaincode approveformyorg -o localhost:7050 --ordererTLSHostnameOverride orderer.example.com --channelID mychannel --name private --version 1.0 --collections-config ../asset-transfer-private-data/chaincode-go/collections_config.json --signature-policy "OR('Org1MSP.member','Org2MSP.member')" --package-id $CC_PACKAGE_ID --sequence 1 --tls --cafile $ORDERER_CA
After channel members agree to the private data collection as part of the chaincode
definition, the data collection is committed to the channel using the peer lifecycle chaincode commit
command. If you look for the commit command in your logs, you can see that it uses
the same --collections-config flag to provide the path to the collection definition.
peer lifecycle chaincode commit -o localhost:7050 --ordererTLSHostnameOverride orderer.example.com --channelID mychannel --name private --version 1.0 --sequence 1 --collections-config ../asset-transfer-private-data/chaincode-go/collections_config.json --signature-policy "OR('Org1MSP.member','Org2MSP.member')" --tls --cafile $ORDERER_CA --peerAddresses localhost:7051 --tlsRootCertFiles $ORG1_CA --peerAddresses localhost:9051 --tlsRootCertFiles $ORG2_CA
Register identities
The private data transfer smart contract supports ownership by individual identities that belong to the network. In our scenario, the owner of the asset will be a member of Org1, while the buyer will belong to Org2. To highlight the connection between the GetClientIdentity().GetID() API and the information within a user’s certificate, we will register two new identities using the Org1 and Org2 Certificate Authorities (CA’s), and then use the CA’s to generate each identity’s certificate and private key.
First, we need to set the following environment variables to use the Fabric CA client:
export PATH=${PWD}/../bin:${PWD}:$PATH
export FABRIC_CFG_PATH=$PWD/../config/
We will use the Org1 CA to create the identity asset owner. Set the Fabric CA client home to the MSP of the Org1 CA admin (this identity was generated by the test network script):
export FABRIC_CA_CLIENT_HOME=${PWD}/organizations/peerOrganizations/org1.example.com/
You can register a new owner client identity using the fabric-ca-client tool:
fabric-ca-client register --caname ca-org1 --id.name owner --id.secret ownerpw --id.type client --tls.certfiles "${PWD}/organizations/fabric-ca/org1/tls-cert.pem"
You can now generate the identity certificates and MSP folder by providing the enroll name and secret to the enroll command:
fabric-ca-client enroll -u https://owner:ownerpw@localhost:7054 --caname ca-org1 -M "${PWD}/organizations/peerOrganizations/org1.example.com/users/owner@org1.example.com/msp" --tls.certfiles "${PWD}/organizations/fabric-ca/org1/tls-cert.pem"
Run the command below to copy the Node OU configuration file into the owner identity MSP folder.
cp "${PWD}/organizations/peerOrganizations/org1.example.com/msp/config.yaml" "${PWD}/organizations/peerOrganizations/org1.example.com/users/owner@org1.example.com/msp/config.yaml"
We can now use the Org2 CA to create the buyer identity. Set the Fabric CA client home the Org2 CA admin:
export FABRIC_CA_CLIENT_HOME=${PWD}/organizations/peerOrganizations/org2.example.com/
You can register a new owner client identity using the fabric-ca-client tool:
fabric-ca-client register --caname ca-org2 --id.name buyer --id.secret buyerpw --id.type client --tls.certfiles "${PWD}/organizations/fabric-ca/org2/tls-cert.pem"
We can now enroll to generate the identity MSP folder:
fabric-ca-client enroll -u https://buyer:buyerpw@localhost:8054 --caname ca-org2 -M "${PWD}/organizations/peerOrganizations/org2.example.com/users/buyer@org2.example.com/msp" --tls.certfiles "${PWD}/organizations/fabric-ca/org2/tls-cert.pem"
Run the command below to copy the Node OU configuration file into the buyer identity MSP folder.
cp "${PWD}/organizations/peerOrganizations/org2.example.com/msp/config.yaml" "${PWD}/organizations/peerOrganizations/org2.example.com/users/buyer@org2.example.com/msp/config.yaml"
Create an asset in private data
Now that we have created the identity of the asset owner, we can invoke the private data smart contract to create a new asset. Copy and paste the following set of commands into your terminal in the test-network directory:
Try it yourself
export PATH=${PWD}/../bin:$PATH
export FABRIC_CFG_PATH=$PWD/../config/
export CORE_PEER_TLS_ENABLED=true
export CORE_PEER_LOCALMSPID="Org1MSP"
export CORE_PEER_TLS_ROOTCERT_FILE=${PWD}/organizations/peerOrganizations/org1.example.com/peers/peer0.org1.example.com/tls/ca.crt
export CORE_PEER_MSPCONFIGPATH=${PWD}/organizations/peerOrganizations/org1.example.com/users/owner@org1.example.com/msp
export CORE_PEER_ADDRESS=localhost:7051
We will use the CreateAsset function to create an asset that is stored in private
data — assetID asset1 with a color green, size 20 and appraisedValue of 100. Recall that private data appraisedValue
will be stored separately from the private data assetID, color, size.
For this reason, the CreateAsset function calls the PutPrivateData() API
twice to persist the private data, once for each collection. Also note that
the private data is passed using the --transient flag. Inputs passed
as transient data will not be persisted in the transaction in order to keep
the data private. Transient data is passed as binary data and therefore when
using terminal it must be base64 encoded. We use an environment variable
to capture the base64 encoded value, and use tr command to strip off the
problematic newline characters that linux base64 command adds.
Run the following command to create the asset:
export ASSET_PROPERTIES=$(echo -n "{\"objectType\":\"asset\",\"assetID\":\"asset1\",\"color\":\"green\",\"size\":20,\"appraisedValue\":100}" | base64 | tr -d \\n)
peer chaincode invoke -o localhost:7050 --ordererTLSHostnameOverride orderer.example.com --tls --cafile "${PWD}/organizations/ordererOrganizations/example.com/orderers/orderer.example.com/msp/tlscacerts/tlsca.example.com-cert.pem" -C mychannel -n private -c '{"function":"CreateAsset","Args":[]}' --transient "{\"asset_properties\":\"$ASSET_PROPERTIES\"}"
You should see results similar to:
[chaincodeCmd] chaincodeInvokeOrQuery->INFO 001 Chaincode invoke successful. result: status:200
Note that command above only targets the Org1 peer. The CreateAsset transaction writes to two collections, assetCollection and Org1MSPPrivateCollection.
The Org1MSPPrivateCollection requires an endorsement from the Org1 peer in order to write to the collection, while the assetCollection inherits the endorsement policy of the chaincode, "OR('Org1MSP.peer','Org2MSP.peer')".
An endorsement from the Org1 peer can meet both endorsement policies and is able to create an asset without an endorsement from Org2.
Transfer the Asset
Let’s see what it takes to transfer asset1 to Org2. In this case, Org2 needs to agree
to buy the asset from Org1, and they need to agree on the appraisedValue. You may be wondering how they can
agree if Org1 keeps their opinion of the appraisedValue in their private side database. For the answer
to this, lets continue.
Try it yourself
Switch back to the terminal with our peer CLI.
To transfer an asset, the buyer (recipient) needs to agree to the same appraisedValue as the asset owner, by calling chaincode function AgreeToTransfer. The agreed value will be stored in the Org2MSPDetailsCollection collection on the Org2 peer. Run the following commands to agree to the appraised value of 100 as Org2:
export ASSET_VALUE=$(echo -n "{\"assetID\":\"asset1\",\"appraisedValue\":100}" | base64 | tr -d \\n)
peer chaincode invoke -o localhost:7050 --ordererTLSHostnameOverride orderer.example.com --tls --cafile "${PWD}/organizations/ordererOrganizations/example.com/orderers/orderer.example.com/msp/tlscacerts/tlsca.example.com-cert.pem" -C mychannel -n private -c '{"function":"AgreeToTransfer","Args":[]}' --transient "{\"asset_value\":\"$ASSET_VALUE\"}"
The buyer can now query the value they agreed to in the Org2 private data collection:
peer chaincode query -o localhost:7050 --ordererTLSHostnameOverride orderer.example.com --tls --cafile "${PWD}/organizations/ordererOrganizations/example.com/orderers/orderer.example.com/msp/tlscacerts/tlsca.example.com-cert.pem" -C mychannel -n private -c '{"function":"ReadAssetPrivateDetails","Args":["Org2MSPPrivateCollection","asset1"]}'
The invoke will return the following value:
{"assetID":"asset1","appraisedValue":100}
Now that buyer has agreed to buy the asset for the appraised value, the owner can transfer the asset to Org2. The asset needs to be transferred by the identity that owns the asset, so lets go acting as Org1:
export CORE_PEER_LOCALMSPID="Org1MSP"
export CORE_PEER_MSPCONFIGPATH=${PWD}/organizations/peerOrganizations/org1.example.com/users/owner@org1.example.com/msp
export CORE_PEER_TLS_ROOTCERT_FILE=${PWD}/organizations/peerOrganizations/org1.example.com/peers/peer0.org1.example.com/tls/ca.crt
export CORE_PEER_ADDRESS=localhost:7051
The owner from Org1 can read the data added by the AgreeToTransfer transaction to view the buyer identity:
peer chaincode query -o localhost:7050 --ordererTLSHostnameOverride orderer.example.com --tls --cafile "${PWD}/organizations/ordererOrganizations/example.com/orderers/orderer.example.com/msp/tlscacerts/tlsca.example.com-cert.pem" -C mychannel -n private -c '{"function":"ReadTransferAgreement","Args":["asset1"]}'
{"assetID":"asset1","buyerID":"eDUwOTo6Q049YnV5ZXIsT1U9Y2xpZW50LE89SHlwZXJsZWRnZXIsU1Q9Tm9ydGggQ2Fyb2xpbmEsQz1VUzo6Q049Y2Eub3JnMi5leGFtcGxlLmNvbSxPPW9yZzIuZXhhbXBsZS5jb20sTD1IdXJzbGV5LFNUPUhhbXBzaGlyZSxDPVVL"}
We now have all we need to transfer the asset. The smart contract uses the
GetPrivateDataHash() function to check that the hash of the asset appraisal
value in Org1MSPPrivateCollection matches the hash of the appraisal value in the
Org2MSPPrivateCollection. If the hashes are the same, it confirms that the
owner and the interested buyer have agreed to the same asset value. If the
conditions are met, the transfer function will get the client ID of the buyer
from the transfer agreement and make the buyer the new owner of the asset. The transfer
function will also delete the asset appraisal value from the collection of the former owner,
as well as remove the transfer agreement from the assetCollection.
Run the following commands to transfer the asset. The owner needs to provide the assetID and the organization MSP ID of the buyer to the transfer transaction:
export ASSET_OWNER=$(echo -n "{\"assetID\":\"asset1\",\"buyerMSP\":\"Org2MSP\"}" | base64 | tr -d \\n)
peer chaincode invoke -o localhost:7050 --ordererTLSHostnameOverride orderer.example.com --tls --cafile "${PWD}/organizations/ordererOrganizations/example.com/orderers/orderer.example.com/msp/tlscacerts/tlsca.example.com-cert.pem" -C mychannel -n private -c '{"function":"TransferAsset","Args":[]}' --transient "{\"asset_owner\":\"$ASSET_OWNER\"}" --peerAddresses localhost:7051 --tlsRootCertFiles "${PWD}/organizations/peerOrganizations/org1.example.com/peers/peer0.org1.example.com/tls/ca.crt"
You can query asset1 to see the results of the transfer:
peer chaincode query -o localhost:7050 --ordererTLSHostnameOverride orderer.example.com --tls --cafile "${PWD}/organizations/ordererOrganizations/example.com/orderers/orderer.example.com/msp/tlscacerts/tlsca.example.com-cert.pem" -C mychannel -n private -c '{"function":"ReadAsset","Args":["asset1"]}'
The results will show that the buyer identity now owns the asset:
{"objectType":"asset","assetID":"asset1","color":"green","size":20,"owner":"x509::CN=appUser2, OU=client + OU=org2 + OU=department1::CN=ca.org2.example.com, O=org2.example.com, L=Hursley, ST=Hampshire, C=UK"}
The “owner” of the asset now has the buyer identity.
You can also confirm that transfer removed the private details from the Org1 collection:
peer chaincode query -o localhost:7050 --ordererTLSHostnameOverride orderer.example.com --tls --cafile "${PWD}/organizations/ordererOrganizations/example.com/orderers/orderer.example.com/msp/tlscacerts/tlsca.example.com-cert.pem" -C mychannel -n private -c '{"function":"ReadAssetPrivateDetails","Args":["Org1MSPPrivateCollection","asset1"]}'
Your query will return empty result, since the asset private data is removed from the Org1 private data collection.
Purge Private Data
For use cases where private data only needs to be persisted for a short period of time, it is possible to “purge” the data after a certain set number of blocks, leaving behind only a hash of the data that serves as immutable evidence of the transaction. An organization could decide to purge private data if the data contained sensitive information that was used by another transaction, but is not longer needed, or if the data is being replicated into an off-chain database.
The appraisedValue data in our example contains a private agreement that
the organization may want to expire after a certain period of time. Thus, it
has a limited lifespan, and can be purged after existing unchanged on the
blockchain for a designated number of blocks using the blockToLive property
in the collection definition.
The Org2MSPPrivateCollection definition has a blockToLive
property value of 3, meaning this data will live on the side database for
three blocks and then after that it will get purged. If we create additional
blocks on the channel, the appraisedValue agreed to by Org2 will eventually
get purged. We can create 3 new blocks to demonstrate:
Try it yourself
Run the following commands in your terminal to switch back to operating as member of Org2 and target the Org2 peer:
export CORE_PEER_LOCALMSPID="Org2MSP"
export CORE_PEER_TLS_ROOTCERT_FILE=${PWD}/organizations/peerOrganizations/org2.example.com/peers/peer0.org2.example.com/tls/ca.crt
export CORE_PEER_MSPCONFIGPATH=${PWD}/organizations/peerOrganizations/org2.example.com/users/buyer@org2.example.com/msp
export CORE_PEER_ADDRESS=localhost:9051
We can still query the appraisedValue in the Org2MSPPrivateCollection:
peer chaincode query -o localhost:7050 --ordererTLSHostnameOverride orderer.example.com --tls --cafile "${PWD}/organizations/ordererOrganizations/example.com/orderers/orderer.example.com/msp/tlscacerts/tlsca.example.com-cert.pem" -C mychannel -n private -c '{"function":"ReadAssetPrivateDetails","Args":["Org2MSPPrivateCollection","asset1"]}'
You should see the value printed in your logs:
{"assetID":"asset1","appraisedValue":100}
Since we need to keep track of how many blocks we are adding before the private data gets purged, open a new terminal window and run the following command to view the private data logs for the Org2 peer. Note the highest block number.
docker logs peer0.org1.example.com 2>&1 | grep -i -a -E 'private|pvt|privdata'
Now return to the terminal where we are acting as a member of Org2 and run the following commands to create three new assets. Each command will create a new block.
export ASSET_PROPERTIES=$(echo -n "{\"objectType\":\"asset\",\"assetID\":\"asset2\",\"color\":\"blue\",\"size\":30,\"appraisedValue\":100}" | base64 | tr -d \\n)
peer chaincode invoke -o localhost:7050 --ordererTLSHostnameOverride orderer.example.com --tls --cafile "${PWD}/organizations/ordererOrganizations/example.com/orderers/orderer.example.com/msp/tlscacerts/tlsca.example.com-cert.pem" -C mychannel -n private -c '{"function":"CreateAsset","Args":[]}' --transient "{\"asset_properties\":\"$ASSET_PROPERTIES\"}"
export ASSET_PROPERTIES=$(echo -n "{\"objectType\":\"asset\",\"assetID\":\"asset3\",\"color\":\"red\",\"size\":25,\"appraisedValue\":100}" | base64 | tr -d \\n)
peer chaincode invoke -o localhost:7050 --ordererTLSHostnameOverride orderer.example.com --tls --cafile "${PWD}/organizations/ordererOrganizations/example.com/orderers/orderer.example.com/msp/tlscacerts/tlsca.example.com-cert.pem" -C mychannel -n private -c '{"function":"CreateAsset","Args":[]}' --transient "{\"asset_properties\":\"$ASSET_PROPERTIES\"}"
export ASSET_PROPERTIES=$(echo -n "{\"objectType\":\"asset\",\"assetID\":\"asset4\",\"color\":\"orange\",\"size\":15,\"appraisedValue\":100}" | base64 | tr -d \\n)
peer chaincode invoke -o localhost:7050 --ordererTLSHostnameOverride orderer.example.com --tls --cafile "${PWD}/organizations/ordererOrganizations/example.com/orderers/orderer.example.com/msp/tlscacerts/tlsca.example.com-cert.pem" -C mychannel -n private -c '{"function":"CreateAsset","Args":[]}' --transient "{\"asset_properties\":\"$ASSET_PROPERTIES\"}"
Return to the other terminal and run the following command to confirm that the new assets resulted in the creation of three new blocks:
docker logs peer0.org1.example.com 2>&1 | grep -i -a -E 'private|pvt|privdata'
The appraisedValue has now been purged from the Org2MSPDetailsCollection
private data collection. Issue the query again from the Org2 terminal to see that
the response is empty.
peer chaincode query -o localhost:7050 --ordererTLSHostnameOverride orderer.example.com --tls --cafile "${PWD}/organizations/ordererOrganizations/example.com/orderers/orderer.example.com/msp/tlscacerts/tlsca.example.com-cert.pem" -C mychannel -n private -c '{"function":"ReadAssetPrivateDetails","Args":["Org2MSPPrivateCollection","asset1"]}'
Using indexes with private data
Indexes can also be applied to private data collections, by packaging indexes in
the META-INF/statedb/couchdb/collections/<collection_name>/indexes directory
alongside the chaincode. An example index is available here .
For deployment of chaincode to production environments, it is recommended
to define any indexes alongside chaincode so that the chaincode and supporting
indexes are deployed automatically as a unit, once the chaincode has been
installed on a peer and instantiated on a channel. The associated indexes are
automatically deployed upon chaincode instantiation on the channel when
the --collections-config flag is specified pointing to the location of
the collection JSON file.
Note
It is not possible to create an index for use with an implicit private data collection.
An implicit collection is based on the organizations name and is created automatically. The format of the name
is _implicit_org_<OrgsMSPid>
Please see FAB-17916 for more information.
Clean up
When you are finished using the private data smart contract, you can bring down the test
network using network.sh script.
./network.sh down
This command will bring down the CAs, peers, and ordering node of the network that we created. Note that all of the data on the ledger will be lost. If you want to go through the tutorial again, you will start from a clean initial state.
Additional resources
For additional private data education, a video tutorial has been created.
Note
The video uses the previous lifecycle model to install private data collections with chaincode.