Writing Your First Application
Note
If you’re not yet familiar with the fundamental architecture of a Fabric network, you may want to visit the Key Concepts section prior to continuing.
It is also worth noting that this tutorial serves as an introduction to Fabric applications and uses simple smart contracts and applications. For a more in-depth look at Fabric applications and smart contracts, check out our Developing Applications section or the Commercial paper tutorial.
In this tutorial we’ll be looking at a handful of sample programs to see how
Fabric apps work. These applications and the smart contracts they use are
collectively known as FabCar. They provide a great starting point to
understand a Hyperledger Fabric blockchain. You’ll learn how to write an
application and smart contract to query and update a ledger, and how to use a
Certificate Authority to generate the X.509 certificates used by applications
which interact with a permissioned blockchain.
We will use the application SDK — described in detail in the Application topic – to invoke a smart contract which queries and updates the ledger using the smart contract SDK — described in detail in section Smart Contract Processing.
We’ll go through three principle steps:
1. Setting up a development environment. Our application needs a network to interact with, so we’ll get a basic network our smart contracts and application will use.

2. Learning about a sample smart contract, FabCar. We’ll inspect the smart contract to learn about the transactions within them, and how they are used by applications to query and update the ledger.
3. Develop a sample application which uses FabCar. Our application will use the FabCar smart contract to query and update car assets on the ledger. We’ll get into the code of the apps and the transactions they create, including querying a car, querying a range of cars, and creating a new car.
After completing this tutorial you should have a basic understanding of how an application is programmed in conjunction with a smart contract to interact with the ledger hosted and replicated on the peers in a Fabric network.
Note
These applications are also compatible with Service Discovery and Private data, though we won’t explicitly show how to use our apps to leverage those features.
Set up the blockchain network
Note
This next section requires you to be in the first-network
subdirectory within your local clone of the fabric-samples repo.
If you’ve already run through Building Your First Network, you will have downloaded
fabric-samples and have a network up and running. Before you run this
tutorial, you must stop this network:
./byfn.sh down
If you have run through this tutorial before, use the following commands to kill any stale or active containers. Note, this will take down all of your containers whether they’re Fabric related or not.
docker rm -f $(docker ps -aq)
docker rmi -f $(docker images | grep fabcar | awk '{print $3}')
If you don’t have a development environment and the accompanying artifacts for the network and applications, visit the Prerequisites page and ensure you have the necessary dependencies installed on your machine.
Next, if you haven’t done so already, visit the Install Samples, Binaries and Docker Images page and follow
the provided instructions. Return to this tutorial once you have cloned the
fabric-samples repository, and downloaded the latest stable Fabric images
and available utilities.
If you are using Mac OS and running Mojave, you will need to install Xcode.
Launch the network
Note
This next section requires you to be in the fabcar
subdirectory within your local clone of the fabric-samples repo.
This tutorial demonstrates the JavaScript versions of the FabCar
smart contract and application, but the fabric-samples repo also
contains Java and TypeScript versions of this sample. To try the
Java or TypeScript versions, change the javascript argument
for ./startFabric.sh below to either java or typescript
and follow the instructions written to the terminal.
Launch your network using the startFabric.sh shell script. This command will
spin up a blockchain network comprising peers, orderers, certificate
authorities and more. It will also install and instantiate a JavaScript version
of the FabCar smart contract which will be used by our application to access
the ledger. We’ll learn more about these components as we go through the
tutorial.
./startFabric.sh javascript
Alright, you’ve now got a sample network up and running, and the FabCar
smart contract installed and instantiated. Let’s install our application
pre-requisites so that we can try it out, and see how everything works together.
Install the application
Note
The following instructions require you to be in the
fabcar/javascript subdirectory within your local clone of the
fabric-samples repo.
Run the following command to install the Fabric dependencies for the applications. It will take about a minute to complete:
npm install
This process is installing the key application dependencies defined in
package.json. The most important of which is the fabric-network class;
it enables an application to use identities, wallets, and gateways to connect to
channels, submit transactions, and wait for notifications. This tutorial also
uses the fabric-ca-client class to enroll users with their respective
certificate authorities, generating a valid identity which is then used by
fabric-network class methods.
Once npm install completes, everything is in place to run the application.
For this tutorial, you’ll primarily be using the application JavaScript files in
the fabcar/javascript directory. Let’s take a look at what’s inside:
ls
You should see the following:
enrollAdmin.js  node_modules       package.json  registerUser.js
invoke.js       package-lock.json  query.js      wallet
There are files for other program languages, for example in the
fabcar/typescript directory. You can read these once you’ve used the
JavaScript example – the principles are the same.
If you are using Mac OS and running Mojave, you will need to install Xcode.
Enrolling the admin user
Note
The following two sections involve communication with the Certificate
Authority. You may find it useful to stream the CA logs when running
the upcoming programs by opening a new terminal shell and running
docker logs -f ca_peerOrg1.
When we created the network, an admin user — literally called admin —
was created as the registrar for the certificate authority (CA). Our first
step is to generate the private key, public key, and X.509 certificate for
admin using the enroll.js program. This process uses a Certificate
Signing Request (CSR) — the private and public key are first generated
locally and the public key is then sent to the CA which returns an encoded
certificate for use by the application. These three credentials are then stored
in the wallet, allowing us to act as an administrator for the CA.
We will subsequently register and enroll a new application user which will be used by our application to interact with the blockchain.
Let’s enroll user admin:
node enrollAdmin.js
This command has stored the CA administrator’s credentials in the wallet
directory.
Register and enroll user1
Now that we have the administrator’s credentials in a wallet, we can enroll a
new user — user1 — which will be used to query and update the ledger:
node registerUser.js
Similar to the admin enrollment, this program uses a CSR to enroll user1 and
store its credentials alongside those of admin in the wallet. We now have
identities for two separate users — admin and user1 — and these are
used by our application.
Time to interact with the ledger…
Querying the ledger
Each peer in a blockchain network hosts a copy of the ledger, and an application program can query the ledger by invoking a smart contract which queries the most recent value of the ledger and returns it to the application.
Here is a simplified representation of how a query works:
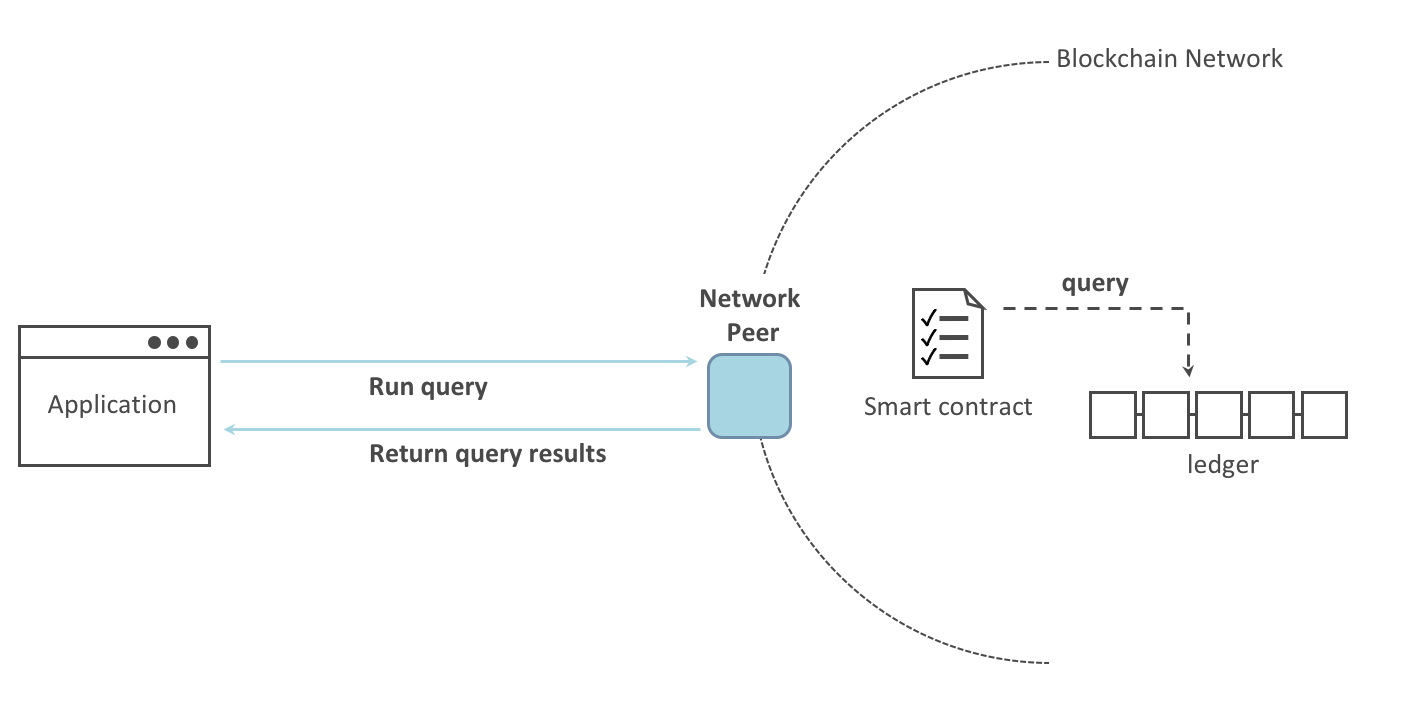
Applications read data from the ledger using a query. The most common queries involve the current values of data in the ledger – its world state. The world state is represented as a set of key-value pairs, and applications can query data for a single key or multiple keys. Moreover, the ledger world state can be configured to use a database like CouchDB which supports complex queries when key-values are modeled as JSON data. This can be very helpful when looking for all assets that match certain keywords with particular values; all cars with a particular owner, for example.
First, let’s run our query.js program to return a listing of all the cars on
the ledger. This program uses our second identity – user1 – to access the
ledger:
node query.js
The output should look like this:
Wallet path: ...fabric-samples/fabcar/javascript/wallet
Transaction has been evaluated, result is:
[{"Key":"CAR0", "Record":{"colour":"blue","make":"Toyota","model":"Prius","owner":"Tomoko"}},
{"Key":"CAR1", "Record":{"colour":"red","make":"Ford","model":"Mustang","owner":"Brad"}},
{"Key":"CAR2", "Record":{"colour":"green","make":"Hyundai","model":"Tucson","owner":"Jin Soo"}},
{"Key":"CAR3", "Record":{"colour":"yellow","make":"Volkswagen","model":"Passat","owner":"Max"}},
{"Key":"CAR4", "Record":{"colour":"black","make":"Tesla","model":"S","owner":"Adriana"}},
{"Key":"CAR5", "Record":{"colour":"purple","make":"Peugeot","model":"205","owner":"Michel"}},
{"Key":"CAR6", "Record":{"colour":"white","make":"Chery","model":"S22L","owner":"Aarav"}},
{"Key":"CAR7", "Record":{"colour":"violet","make":"Fiat","model":"Punto","owner":"Pari"}},
{"Key":"CAR8", "Record":{"colour":"indigo","make":"Tata","model":"Nano","owner":"Valeria"}},
{"Key":"CAR9", "Record":{"colour":"brown","make":"Holden","model":"Barina","owner":"Shotaro"}}]
Let’s take a closer look at this program. Use an editor (e.g. atom or visual
studio) and open query.js.
The application starts by bringing in scope two key classes from the
fabric-network module; FileSystemWallet and Gateway. These classes
will be used to locate the user1 identity in the wallet, and use it to
connect to the network:
const { FileSystemWallet, Gateway } = require('fabric-network');
The application connects to the network using a gateway:
const gateway = new Gateway();
await gateway.connect(ccp, { wallet, identity: 'user1' });
This code creates a new gateway and then uses it to connect the application to
the network. ccp describes the network that the gateway will access with the
identity user1 from wallet. See how the ccp has been loaded from
../../first-network/connection-org1.json and parsed as a JSON file:
const ccpPath = path.resolve(__dirname, '..', '..', 'first-network', 'connection-org1.json');
const ccpJSON = fs.readFileSync(ccpPath, 'utf8');
const ccp = JSON.parse(ccpJSON);
If you’d like to understand more about the structure of a connection profile, and how it defines the network, check out the connection profile topic.
A network can be divided into multiple channels, and the next important line of
code connects the application to a particular channel within the network,
mychannel:
Within this channel, we can access the smart contract fabcar to interact
with the ledger:
const contract = network.getContract('fabcar');
Within fabcar there are many different transactions, and our application
initially uses the queryAllCars transaction to access the ledger world state
data:
const result = await contract.evaluateTransaction('queryAllCars');
The evaluateTransaction method represents one of the simplest interaction
with a smart contract in blockchain network. It simply picks a peer defined in
the connection profile and sends the request to it, where it is evaluated. The
smart contract queries all the cars on the peer’s copy of the ledger and returns
the result to the application. This interaction does not result in an update the
ledger.
The FabCar smart contract
Let’s take a look at the transactions within the FabCar smart contract.
Navigate to the chaincode/fabcar/javascript/lib subdirectory at the root of
fabric-samples and open fabcar.js in your editor.
See how our smart contract is defined using the Contract class:
class FabCar extends Contract {...
Within this class structure, you’ll see that we have the following
transactions defined: initLedger, queryCar, queryAllCars,
createCar, and changeCarOwner. For example:
async queryCar(ctx, carNumber) {...}
async queryAllCars(ctx) {...}
Let’s take a closer look at the queryAllCars transaction to see how it
interacts with the ledger.
async queryAllCars(ctx) {

  const startKey = 'CAR0';
  const endKey = 'CAR999';

  const iterator = await ctx.stub.getStateByRange(startKey, endKey);
This code defines the range of cars that queryAllCars will retrieve from the
ledger. Every car between CAR0 and CAR999 – 1,000 cars in all, assuming
every key has been tagged properly – will be returned by the query. The
remainder of the code iterates through the query results and packages them into
JSON for the application.
Below is a representation of how an application would call different
transactions in a smart contract. Each transaction uses a broad set of APIs such
as getStateByRange to interact with the ledger. You can read more about
these APIs in detail.
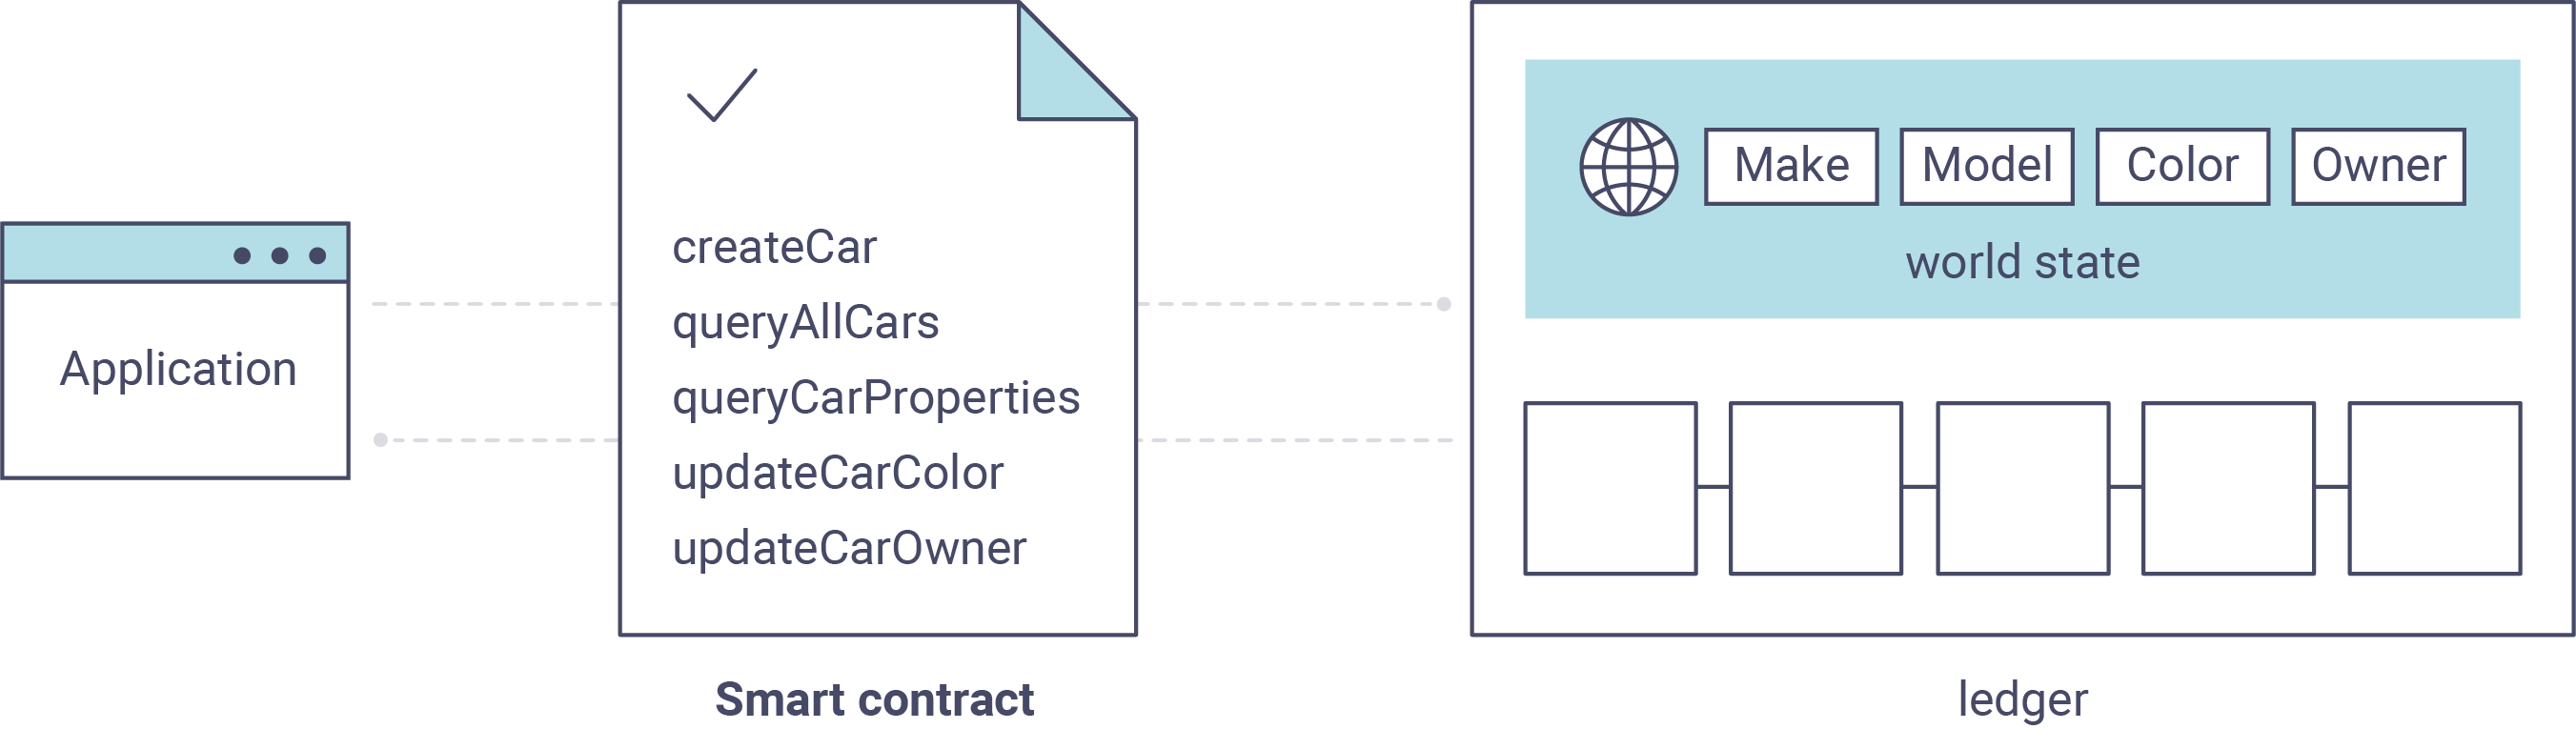
We can see our queryAllCars transaction, and another called createCar.
We will use this later in the tutorial to update the ledger, and add a new block
to the blockchain.
But first, go back to the query program and change the
evaluateTransaction request to query CAR4. The query program should
now look like this:
const result = await contract.evaluateTransaction('queryCar', 'CAR4');
Save the program and navigate back to your fabcar/javascript directory.
Now run the query program again:
node query.js
You should see the following:
Wallet path: ...fabric-samples/fabcar/javascript/wallet
Transaction has been evaluated, result is:
{"colour":"black","make":"Tesla","model":"S","owner":"Adriana"}
If you go back and look at the result from when the transaction was
queryAllCars, you can see that CAR4 was Adriana’s black Tesla model S,
which is the result that was returned here.
We can use the queryCar transaction to query against any car, using its
key (e.g. CAR0) and get whatever make, model, color, and owner correspond to
that car.
Great. At this point you should be comfortable with the basic query transactions in the smart contract and the handful of parameters in the query program.
Time to update the ledger…
Updating the ledger
Now that we’ve done a few ledger queries and added a bit of code, we’re ready to update the ledger. There are a lot of potential updates we could make, but let’s start by creating a new car.
From an application perspective, updating the ledger is simple. An application submits a transaction to the blockchain network, and when it has been validated and committed, the application receives a notification that the transaction has been successful. Under the covers this involves the process of consensus whereby the different components of the blockchain network work together to ensure that every proposed update to the ledger is valid and performed in an agreed and consistent order.
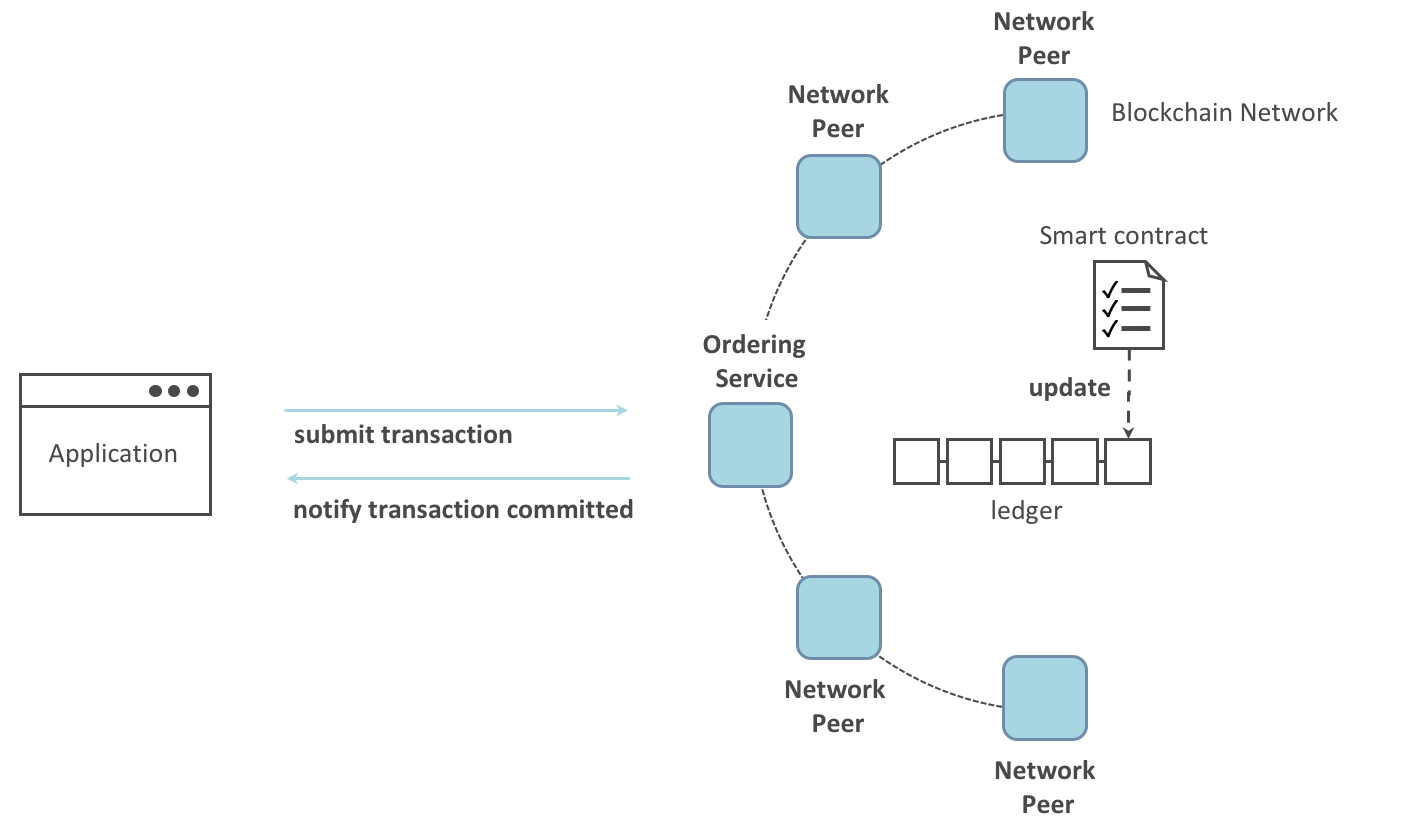
Above, you can see the major components that make this process work. As well as the multiple peers which each host a copy of the ledger, and optionally a copy of the smart contract, the network also contains an ordering service. The ordering service coordinates transactions for a network; it creates blocks containing transactions in a well-defined sequence originating from all the different applications connected to the network.
Our first update to the ledger will create a new car. We have a separate program
called invoke.js that we will use to make updates to the ledger. Just as with
queries, use an editor to open the program and navigate to the code block where
we construct our transaction and submit it to the network:
await contract.submitTransaction('createCar', 'CAR12', 'Honda', 'Accord', 'Black', 'Tom');
See how the applications calls the smart contract transaction createCar to
create a black Honda Accord with an owner named Tom. We use CAR12 as the
identifying key here, just to show that we don’t need to use sequential keys.
Save it and run the program:
node invoke.js
If the invoke is successful, you will see output like this:
Wallet path: ...fabric-samples/fabcar/javascript/wallet
2018-12-11T14:11:40.935Z - info: [TransactionEventHandler]: _strategySuccess: strategy success for transaction "9076cd4279a71ecf99665aed0ed3590a25bba040fa6b4dd6d010f42bb26ff5d1"
Transaction has been submitted
Notice how the invoke application interacted with the blockchain network
using the submitTransaction API, rather than evaluateTransaction.
await contract.submitTransaction('createCar', 'CAR12', 'Honda', 'Accord', 'Black', 'Tom');
submitTransaction is much more sophisticated than evaluateTransaction.
Rather than interacting with a single peer, the SDK will send the
submitTransaction proposal to every required organization’s peer in the
blockchain network. Each of these peers will execute the requested smart
contract using this proposal, to generate a transaction response which it signs
and returns to the SDK. The SDK collects all the signed transaction responses
into a single transaction, which it then sends to the orderer. The orderer
collects and sequences transactions from every application into a block of
transactions. It then distributes these blocks to every peer in the network,
where every transaction is validated and committed. Finally, the SDK is
notified, allowing it to return control to the application.
Note
submitTransaction also includes a listener that checks to make
sure the transaction has been validated and committed to the ledger.
Applications should either utilize a commit listener, or
leverage an API like submitTransaction that does this for you.
Without doing this, your transaction may not have been successfully
orderered, validated, and committed to the ledger.
submitTransaction does all this for the application! The process by which
the application, smart contract, peers and ordering service work together to
keep the ledger consistent across the network is called consensus, and it is
explained in detail in this section.
To see that this transaction has been written to the ledger, go back to
query.js and change the argument from CAR4 to CAR12.
In other words, change this:
const result = await contract.evaluateTransaction('queryCar', 'CAR4');
To this:
const result = await contract.evaluateTransaction('queryCar', 'CAR12');
Save once again, then query:
node query.js
Which should return this:
Wallet path: ...fabric-samples/fabcar/javascript/wallet
Transaction has been evaluated, result is:
{"colour":"Black","make":"Honda","model":"Accord","owner":"Tom"}
Congratulations. You’ve created a car and verified that its recorded on the ledger!
So now that we’ve done that, let’s say that Tom is feeling generous and he wants to give his Honda Accord to someone named Dave.
To do this, go back to invoke.js and change the smart contract transaction
from createCar to changeCarOwner with a corresponding change in input
arguments:
await contract.submitTransaction('changeCarOwner', 'CAR12', 'Dave');
The first argument — CAR12 — identifies the car that will be changing
owners. The second argument — Dave — defines the new owner of the car.
Save and execute the program again:
node invoke.js
Now let’s query the ledger again and ensure that Dave is now associated with the
CAR12 key:
node query.js
It should return this result:
Wallet path: ...fabric-samples/fabcar/javascript/wallet
Transaction has been evaluated, result is:
{"colour":"Black","make":"Honda","model":"Accord","owner":"Dave"}
The ownership of CAR12 has been changed from Tom to Dave.
Note
In a real world application the smart contract would likely have some access control logic. For example, only certain authorized users may create new cars, and only the car owner may transfer the car to somebody else.
Summary
Now that we’ve done a few queries and a few updates, you should have a pretty good sense of how applications interact with a blockchain network using a smart contract to query or update the ledger. You’ve seen the basics of the roles smart contracts, APIs, and the SDK play in queries and updates and you should have a feel for how different kinds of applications could be used to perform other business tasks and operations.
Additional resources
As we said in the introduction, we have a whole section on Developing Applications that includes in-depth information on smart contracts, process and data design, a tutorial using a more in-depth Commercial Paper tutorial and a large amount of other material relating to the development of applications.