Running a Fabric Application
Note
If you’re not yet familiar with the fundamental architecture of a Fabric blockchain network, you may want to visit the Key Concepts section prior to continuing.
You should also be familiar with the Fabric Gateway service and how it relates to the application transaction flow, documented in the Fabric Gateway section.
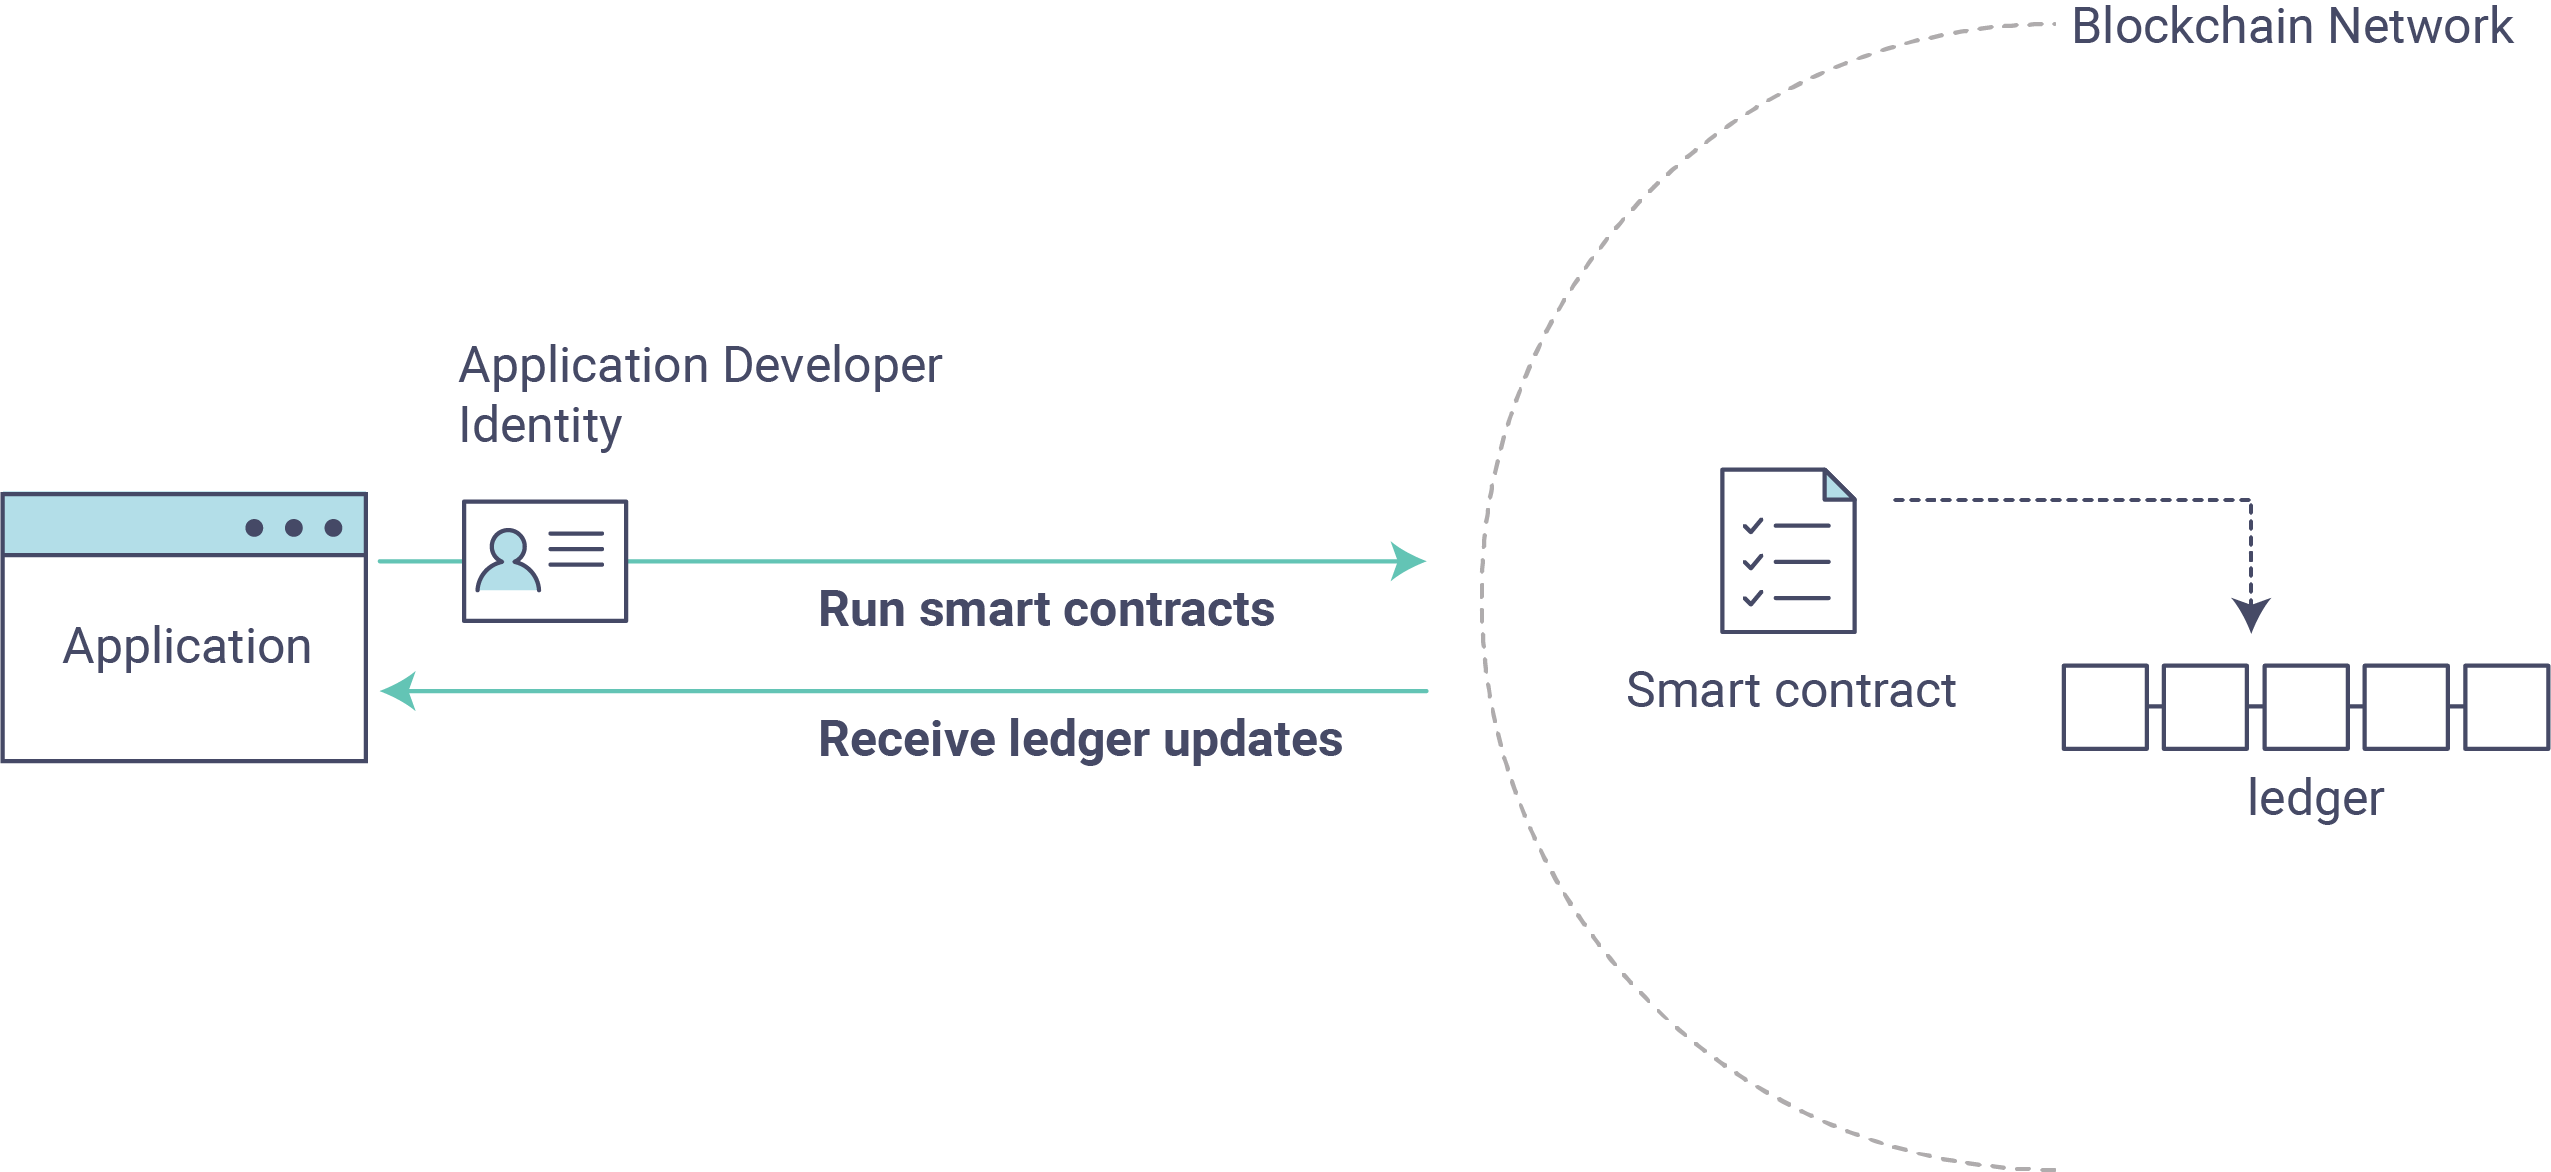
This tutorial provides an introduction to how Fabric applications interact with deployed blockchain networks. The tutorial uses sample programs built using the Fabric Gateway client API to invoke a smart contract, which queries and updates the ledger with the smart contract API – described in detail in Deploying a smart contract to a channel.
About Asset Transfer
The Asset Transfer (basic) sample demonstrates how to create, update, and query assets. It involves the following two components:
1. Sample application: which makes calls to the blockchain network, invoking transactions implemented in the smart contract. The application is located in the following
fabric-samplesdirectory:asset-transfer-basic/application-gateway-(typescript, go, java)2. Smart contract: which implements the transactions that interact with the ledger. The smart contract is located in the following
fabric-samplesdirectory:asset-transfer-basic/chaincode-(typescript, go, java)
This tutorial consists of two principle parts:
1. Set up a blockchain network. Our application needs a blockchain network to interact with, so we will launch a basic network and deploy a smart contract for our application.
2. Run the sample application to interact with the smart contract. Our application will use the assetTransfer smart contract to create, query, and update assets on the ledger. We will step through the code of the application and the transactions it invokes, including creating some initial assets, querying an asset, querying a range of assets, creating a new asset, and transferring an asset to a new owner.
After completing this tutorial you should have a basic understanding of how Fabric applications and smart contracts work together to manage data on the distributed ledger of a blockchain network.
Before you begin
Before you can run the sample application, you need to install Fabric Samples in your environment. Follow the instructions on Getting Started - Install to install the required software.
The sample application in this tutorial uses the Fabric Gateway client API. See the documentation for a up to date list of supported programming language runtimes and dependencies.
Ensure you have a suitable version of your chosen runtime installed. For installation instructions, see:
Set up the blockchain network
If you’ve already run through Using the Fabric test network tutorial and have a network up and running, this tutorial will bring down your running network before bringing up a new one, to ensure you start with an empty ledger.
Launch the blockchain network
Navigate to the test-network subdirectory within your local clone of the fabric-samples repository.
cd fabric-samples/test-network
If you already have a test network running, bring it down to ensure the environment is clean.
./network.sh down
Launch the Fabric test network using the network.sh shell script.
./network.sh up createChannel -c mychannel -ca
This command will deploy the Fabric test network with two peers, an ordering service, and three certificate authorities
(Orderer, Org1, Org2). Instead of using the cryptogen tool, we bring up the test network using certificate authorities,
hence the -ca flag. Additionally, the org admin user registration is bootstrapped when the certificate authority is
started.
Deploy the smart contract
Next, let’s deploy the chaincode package containing the smart contract by calling the ./network.sh script with the
chaincode name and language options.
Note
It is not necessary to use the same programming language for the smart contract and client application.
./network.sh deployCC -ccn basic -ccp ../asset-transfer-basic/chaincode-typescript/ -ccl typescript
./network.sh deployCC -ccn basic -ccp ../asset-transfer-basic/chaincode-go/ -ccl go
./network.sh deployCC -ccn basic -ccp ../asset-transfer-basic/chaincode-java/ -ccl java
This script uses the chaincode lifecycle to package, install, query installed chaincode, approve chaincode for both Org1 and Org2, and finally commit the chaincode.
If the chaincode package is successfully deployed, the end of the output in your terminal should look similar to below:
Committed chaincode definition for chaincode 'basic' on channel 'mychannel':
Version: 1.0, Sequence: 1, Endorsement Plugin: escc, Validation Plugin: vscc, Approvals: [Org1MSP: true, Org2MSP: true]
Query chaincode definition successful on peer0.org2 on channel 'mychannel'
Chaincode initialization is not required
Prepare the sample application
Now, let’s prepare the sample Asset Transfer application that will be used to interact with the deployed smart contract.
Open a new terminal, and navigate to the application directory. This directory contains a sample application developed using the Fabric Gateway client API.
cd asset-transfer-basic/application-gateway-typescript
Run the following command to install the dependencies and build the application. It may take some time to complete:
npm install
This process installs the application dependencies defined in the application’s package.json. The most important
of which is the @hyperledger/fabric-gateway Node.js package; this provides the Fabric Gateway client API used
to connect a Fabric Gateway and, using a specific client identity, to submit and evaluate transactions, and receive
events.
Once npm install completes, everything is in place to run the application.
Let’s take a look at the sample TypeScript application files we will be using in this tutorial. Run the following command to list the files in this directory:
ls
You should see the following:
dist
node_modules
package-lock.json
package.json
src
tsconfig.json
The src directory contains the client application source code. The JavaScript output generated from this source
code during the install process is located in the dist directory, and can be ignored.
cd asset-transfer-basic/application-gateway-go
The application dependencies are defined in the application’s go.mod. The most important of which is the
github.com/hyperledger/fabric-gateway module; this provides the Fabric Gateway client API used to connect a
Fabric Gateway and, using a specific client identity, to submit and evaluate transactions, and receive events.
Let’s take a look at the sample Go application files we will be using in this tutorial. Run the following command to list the files in this directory:
ls
You should see the following:
assetTransfer.go
go.mod
go.sum
The assetTransfer.go file contains the client application source code.
cd asset-transfer-basic/application-gateway-java
Run the following command to install the dependencies and build the application. It may take some time to complete:
./gradlew build
This process installs the application dependencies defined in the application’s build.gradle. The most important
of which is the org.hyperledger.fabric:fabric-gateway package; this provides the Fabric Gateway client API used
to connect a Fabric Gateway and, using a specific client identity, to submit and evaluate transactions, and receive
events.
Once ./gradlew build completes, everything is in place to run the application.
Let’s take a look at the sample Java application files we will be using in this tutorial. Run the following command to list the files in this directory:
ls
You should see the following:
build
build.gradle
gradle
gradlew
gradlew.bat
settings.gradle
src
The src/main/java directory contains the client application source code. The compiled Java class files generated
from this source code during the build process is located in the build directory, and can be ignored.
Run the sample application
When we started the Fabric test network earlier in this tutorial, several identities were created using the Certificate Authorities. These include a user identity for each of the organizations. The application will use the credentials of one of these user identities to transact with the blockchain network.
Let’s run the application and then step through each of the interactions with the smart contract functions. From the
asset-transfer-basic/application-gateway-(typescript, go, java) directory, run the following command:
npm start
go run .
./gradlew run
First, establish a gRPC connection to the Gateway
The client application establishes a gRPC connection to the Fabric Gateway service that it will use to transact with the blockchain network. To do this, it only requires the Fabric Gateway’s endpoint address and, if it is configured to use TLS, appropriate TLS certificates. In this sample, the gateway endpoint address is the address of a peer, which provides the Fabric Gateway service.
Note
There is significant overhead associated with establishing gRPC connections, so this connection should be retained by the application and used for all interactions with the Fabric Gateway.
Warning
In order to maintain security of any private data used in transactions, the application should connect to a Fabric Gateway belonging to the same organization as the client identity. If the client identity’s organization does not host any gateways, then a trusted gateway in another organization should be used.
The application creates a gRPC connection using the TLS certificate of the signing certificate authority so that the authenticity of the gateway’s TLS certificate can be verified.
For a TLS connection to be successfully established, the endpoint address used by the client must match the address in
the gateway’s TLS certificate. Since the client accesses the gateway’s Docker container at a localhost address, an
override gRPC option is specified to force this endpoint address to be interpreted as the gateway’s configured hostname.
const peerEndpoint = 'localhost:7051';
const peerHostOverride = 'peer0.org1.example.com';

async function newGrpcConnection(): Promise<grpc.Client> {
    const tlsRootCert = await fs.readFile(tlsCertPath);
    const tlsCredentials = grpc.credentials.createSsl(tlsRootCert);
    return new grpc.Client(peerEndpoint, tlsCredentials, {
        'grpc.ssl_target_name_override': peerHostOverride,
    });
}
const (
    peerEndpoint = "dns:///localhost:7051"
    peerHostOverride = "peer0.org1.example.com"
)

func newGrpcConnection() *grpc.ClientConn {
    certificatePEM, err := os.ReadFile(tlsCertPath)
    if err != nil {
        panic(fmt.Errorf("failed to read TLS certificate file: %w", err))
    }

    certificate, err := identity.CertificateFromPEM(certificatePEM)
    if err != nil {
        panic(err)
    }

    certPool := x509.NewCertPool()
    certPool.AddCert(certificate)
    transportCredentials := credentials.NewClientTLSFromCert(certPool, peerHostOverride)

    connection, err := grpc.NewClient(peerEndpoint, grpc.WithTransportCredentials(transportCredentials))
    if err != nil {
        panic(fmt.Errorf("failed to create gRPC connection: %w", err))
    }

    return connection
}
private static final String PEER_ENDPOINT = "localhost:7051";
private static final String PEER_HOST_OVERRIDE = "peer0.org1.example.com";

private static ManagedChannel newGrpcConnection() throws IOException {
    var credentials = TlsChannelCredentials.newBuilder()
        .trustManager(TLS_CERT_PATH.toFile())
        .build();
    return Grpc.newChannelBuilder(PEER_ENDPOINT, credentials)
        .overrideAuthority(PEER_HOST_OVERRIDE)
        .build();
}
Second, create a Gateway connection
The application then creates a Gateway connection, which it uses to access any of the Networks (analogous to
channels) accessible to the Fabric Gateway, and subsequently smart Contracts deployed to those networks. A
Gateway connection has three requirements:
gRPC connection to the Fabric Gateway.
Client identity used to transact with the network.
Signing implementation used to generate digital signatures for the client identity.
Additionally, it is good practice to specify the hash algorithm that will be used to generate the message digests passed to the signing implementation, instead of relying on the default value. Different signing implementations may have different hash algorithm requirements.
The sample application uses the Org1 user’s X.509 certificate as the client identity, and a signing implementation based on that user’s private key.
const client = await newGrpcConnection();

const gateway = connect({
    client,
    identity: await newIdentity(),
    signer: await newSigner(),
    hash: hash.sha256,
});

async function newIdentity(): Promise<Identity> {
    const credentials = await fs.promises.readFile(certPath);
    return { mspId: 'Org1MSP', credentials };
}

async function newSigner(): Promise<Signer> {
    const privateKeyPem = await fs.promises.readFile(keyPath);
    const privateKey = crypto.createPrivateKey(privateKeyPem);
    return signers.newPrivateKeySigner(privateKey);
}
clientConnection := newGrpcConnection()
      defer clientConnection.Close()

gw, err := client.Connect(
    newIdentity(),
    client.WithSign(newSign()),
    client.WithHash(hash.SHA256),
    client.WithClientConnection(clientConnection),
)

func newIdentity() *identity.X509Identity {
    certificatePEM, err := os.ReadFile(certPath)
    if err != nil {
        panic(fmt.Errorf("failed to read certificate file: %w", err))
    }

    certificate, err := identity.CertificateFromPEM(certificatePEM)
    if err != nil {
        panic(err)
    }

    id, err := identity.NewX509Identity("Org1MSP", certificate)
    if err != nil {
        panic(err)
    }

    return id
}

func newSign() identity.Sign {
    privateKeyPEM, err := readFirstFile(keyPath)
    if err != nil {
        panic(fmt.Errorf("failed to read private key file: %w", err))
    }

    privateKey, err := identity.PrivateKeyFromPEM(privateKeyPEM)
    if err != nil {
        panic(err)
    }

    sign, err := identity.NewPrivateKeySign(privateKey)
    if err != nil {
        panic(err)
    }

    return sign
}
var channel = newGrpcConnection();

var gateway = Gateway.newInstance()
    .identity(newIdentity())
    .signer(newSigner())
    .hash(Hash.SHA256)
    .connection(channel)
    .connect();

private static Identity newIdentity() throws IOException, CertificateException {
    try (var certReader = Files.newBufferedReader(CERT_PATH)) {
        var certificate = Identities.readX509Certificate(certReader);
        return new X509Identity("Org1MSP", certificate);
    }
}

private static Signer newSigner() throws IOException, InvalidKeyException {
    try (var keyReader = Files.newBufferedReader(KEY_PATH)) {
        var privateKey = Identities.readPrivateKey(keyReader);
        return Signers.newPrivateKeySigner(privateKey);
    }
}
Third, access the smart contract to be invoked
The sample application uses the Gateway connection to get a reference to the Network and then the default
Contract within a chaincode deployed on that network.
const network = gateway.getNetwork(channelName);
const contract = network.getContract(chaincodeName);
network := gw.GetNetwork(channelName)
contract := network.GetContract(chaincodeName)
var network = gateway.getNetwork(CHANNEL_NAME);
var contract = network.getContract(CHAINCODE_NAME);
When a chaincode package includes multiple smart contracts, you can provide both the name of the chaincode and the name
of a specific smart contract as arguments to the getContract() call. For example:
const contract = network.getContract(chaincodeName, smartContractName);
contract := network.GetContractWithName(chaincodeName, smartContractName)
var contract = network.getContract(CHAINCODE_NAME, SMART_CONTRACT_NAME);
Fourth, populate the ledger with sample assets
Immediately after initial deployment of the chaincode package, the ledger is empty. The application uses
submitTransaction() to invoke the InitLedger transaction function, which populates the ledger with some sample
assets. submitTransaction() will use the Fabric Gateway to:
Endorse the transaction proposal.
Submit the endorsed transaction to the ordering service.
Wait for the transaction to be committed, updating ledger state.
Sample application InitLedger call:
await contract.submitTransaction('InitLedger');
_, err := contract.SubmitTransaction("InitLedger")
if err != nil {
    panic(fmt.Errorf("failed to submit transaction: %w", err))
}
contract.submitTransaction("InitLedger");
Fifth, invoke transaction functions to read and write assets
Now the application is ready to execute business logic that queries, creates additional assets, and modifies assets on the ledger by invoking transactions functions on the smart contract.
Query all assets
The application uses evaluateTransaction() to query the ledger by performing a read-only transaction invocation.
evaluateTransaction() will use the Fabric Gateway to invoke the transaction function and return its result. The
transaction is not sent to the ordering service and no ledger update occurs.
Below, the sample application is just getting all the assets created in the previous step when we populated the ledger.
Sample application GetAllAssets call:
const resultBytes = await contract.evaluateTransaction('GetAllAssets');

const resultJson = utf8Decoder.decode(resultBytes);
const result = JSON.parse(resultJson);
console.log('*** Result:', result);
evaluateResult, err := contract.EvaluateTransaction("GetAllAssets")
if err != nil {
    panic(fmt.Errorf("failed to evaluate transaction: %w", err))
}

result := formatJSON(evaluateResult)
fmt.Printf("*** Result:%s\n", result)
var result = contract.evaluateTransaction("GetAllAssets");

System.out.println("*** Result: " + prettyJson(result));
Note
Transaction function results are always returned as bytes since transaction functions can return any type of data. Often transaction functions return strings; or, as in the case above, a UTF-8 string of JSON data. The application is responsible for correctly interpreting the result bytes.
The terminal output should look like this:
*** Result: [
  {
    AppraisedValue: 300,
    Color: 'blue',
    ID: 'asset1',
    Owner: 'Tomoko',
    Size: 5,
    docType: 'asset'
  },
  {
    AppraisedValue: 400,
    Color: 'red',
    ID: 'asset2',
    Owner: 'Brad',
    Size: 5,
    docType: 'asset'
  },
  {
    AppraisedValue: 500,
    Color: 'green',
    ID: 'asset3',
    Owner: 'Jin Soo',
    Size: 10,
    docType: 'asset'
  },
  {
    AppraisedValue: 600,
    Color: 'yellow',
    ID: 'asset4',
    Owner: 'Max',
    Size: 10,
    docType: 'asset'
  },
  {
    AppraisedValue: 700,
    Color: 'black',
    ID: 'asset5',
    Owner: 'Adriana',
    Size: 15,
    docType: 'asset'
  },
  {
    AppraisedValue: 800,
    Color: 'white',
    ID: 'asset6',
    Owner: 'Michel',
    Size: 15,
    docType: 'asset'
  }
]
Create a new asset
The sample application submits a transaction to create a new asset.
Sample application CreateAsset call:
const assetId = `asset${String(Date.now())}`;

await contract.submitTransaction(
    'CreateAsset',
    assetId,
    'yellow',
    '5',
    'Tom',
    '1300',
);
var assetId = fmt.Sprintf("asset%d", now.Unix()*1e3+int64(now.Nanosecond())/1e6)

_, err := contract.SubmitTransaction("CreateAsset", assetId, "yellow", "5", "Tom", "1300")
if err != nil {
    panic(fmt.Errorf("failed to submit transaction: %w", err))
}
private final String assetId = "asset" + Instant.now().toEpochMilli();

contract.submitTransaction("CreateAsset", assetId, "yellow", "5", "Tom", "1300");
Note
In the application snippets above, it is important to note that the CreateAsset transaction is submitted
with the same type and number of arguments the chaincode is expecting, and in the correct sequence. In this
case the correctly sequenced arguments are:
assetId, "yellow", "5", "Tom", "1300"
The corresponding smart contract’s CreateAsset transaction function is expecting the following sequence
of arguments that define the asset object:
ID, Color, Size, Owner, AppraisedValue
Update an asset
The sample application submits a transaction to transfer ownership of the newly created asset. This time
the transaction is invoked using submitAsync(), which returns after successfully submitting the endorsed
transaction to the ordering service instead of waiting until the transaction is committed to the ledger. This allows
the application to perform work using the transaction result while waiting for it to be committed.
Sample application TransferAsset call:
const commit = await contract.submitAsync('TransferAsset', {
    arguments: [assetId, 'Saptha'],
});
const oldOwner = utf8Decoder.decode(commit.getResult());

console.log(`*** Successfully submitted transaction to transfer ownership from ${oldOwner} to Saptha`);
console.log('*** Waiting for transaction commit');

const status = await commit.getStatus();
if (!status.successful) {
    throw new Error(`Transaction ${status.transactionId} failed to commit with status code ${String(status.code)}`);
}

console.log('*** Transaction committed successfully');
submitResult, commit, err := contract.SubmitAsync("TransferAsset", client.WithArguments(assetId, "Mark"))
if err != nil {
    panic(fmt.Errorf("failed to submit transaction asynchronously: %w", err))
}

fmt.Printf("\n*** Successfully submitted transaction to transfer ownership from %s to Mark. \n", string(submitResult))
fmt.Println("*** Waiting for transaction commit.")

if commitStatus, err := commit.Status(); err != nil {
    panic(fmt.Errorf("failed to get commit status: %w", err))
} else if !commitStatus.Successful {
    panic(fmt.Errorf("transaction %s failed to commit with status: %d", commitStatus.TransactionID, int32(commitStatus.Code)))
}

fmt.Printf("*** Transaction committed successfully\n")
var commit = contract.newProposal("TransferAsset")
    .addArguments(assetId, "Saptha")
    .build()
    .endorse()
    .submitAsync();

var result = commit.getResult();
var oldOwner = new String(result, StandardCharsets.UTF_8);

System.out.println("*** Successfully submitted transaction to transfer ownership from " + oldOwner + " to Saptha");
System.out.println("*** Waiting for transaction commit");

var status = commit.getStatus();
if (!status.isSuccessful()) {
    throw new RuntimeException("Transaction " + status.getTransactionId() +
        " failed to commit with status code " + status.getCode());
}

System.out.println("*** Transaction committed successfully");
Terminal output:
*** Successfully submitted transaction to transfer ownership from Tom to Saptha
*** Waiting for transaction commit
*** Transaction committed successfully
Query the updated asset
The sample application then evaluates a query for the transferred asset, showing that it was both created with the properties described, and then subsequently transferred to a new owner.
Sample application ReadAsset call:
const resultBytes = await contract.evaluateTransaction('ReadAsset', assetId);

const resultJson = utf8Decoder.decode(resultBytes);
const result = JSON.parse(resultJson);
console.log('*** Result:', result);
evaluateResult, err := contract.EvaluateTransaction("ReadAsset", assetId)
if err != nil {
    panic(fmt.Errorf("failed to evaluate transaction: %w", err))
}

result := formatJSON(evaluateResult)
fmt.Printf("*** Result:%s\n", result)
var evaluateResult = contract.evaluateTransaction("ReadAsset", assetId);

System.out.println("*** Result:" + prettyJson(evaluateResult));
Terminal output:
*** Result: {
    AppraisedValue: 1300,
    Color: 'yellow',
    ID: 'asset1639084597466',
    Owner: 'Saptha',
    Size: 5
}
Handle transaction errors
The final part of the sequence demonstrates an error submitting a transaction. In this example, the application
attempts to submit an UpdateAsset transaction but specifies an asset ID that does not exist. The transaction
function returns an error response, and the submitTransaction() call fails.
A submitTransaction() failure may generate several different types of error, indicating the point in the submit
flow that the error occurred, and containing additional information to enable the application to respond appropriately.
Consult the API documentation (Node.js,
Go,
Java)
for details of the different error types that may be generated.
Sample application failing UpdateAsset call:
try {
    await contract.submitTransaction(
        'UpdateAsset',
        'asset70',
        'blue',
        '5',
        'Tomoko',
        '300',
    );
    console.log('******** FAILED to return an error');
} catch (error) {
    console.log('*** Successfully caught the error: \n', error);
}
_, err := contract.SubmitTransaction("UpdateAsset", "asset70", "blue", "5", "Tomoko", "300")
if err == nil {
    panic("******** FAILED to return an error")
}

fmt.Println("*** Successfully caught the error:")

var commitStatusErr *client.CommitStatusError
var transactionErr *client.TransactionError

if errors.As(err, &commitStatusErr) {
  if errors.Is(err, context.DeadlineExceeded) {
    fmt.Printf("Timeout waiting for transaction %s commit status: %s\n", commitStatusErr.TransactionID, commitStatusErr)
  } else {
    fmt.Printf("Error obtaining commit status for transaction %s with gRPC status %v: %s\n", commitStatusErr.TransactionID, status.Code(commitStatusErr), commitStatusErr)
  }
} else if errors.As(err, &transactionErr) {
  // The error could be an EndorseError, SubmitError or CommitError.
  fmt.Println(err)
  fmt.Printf("TransactionID: %s\n", transactionErr.TransactionID)
} else {
  panic(fmt.Errorf("unexpected error type %T: %w", err, err))
}
try {
    contract.submitTransaction("UpdateAsset", "asset70", "blue", "5", "Tomoko", "300");
    System.out.println("******** FAILED to return an error");
} catch (EndorseException | SubmitException | CommitStatusException e) {
    System.out.println("*** Successfully caught the error:");
    e.printStackTrace(System.out);
    System.out.println("Transaction ID: " + e.getTransactionId());
} catch (CommitException e) {
    System.out.println("*** Successfully caught the error:");
    e.printStackTrace(System.out);
    System.out.println("Transaction ID: " + e.getTransactionId());
    System.out.println("Status code: " + e.getCode());
}
Terminal Output (with stack traces removed for clarity):
*** Successfully caught the error:
EndorseError: 10 ABORTED: failed to endorse transaction, see attached details for more info
    at ... {
  code: 10,
  details: [
    {
      address: 'peer0.org1.example.com:7051',
      message: 'chaincode response 500, the asset asset70 does not exist',
      mspId: 'Org1MSP'
    }
  ],
  cause: Error: 10 ABORTED: failed to endorse transaction, see attached details for more info
      at ... {
    code: 10,
    details: 'failed to endorse transaction, see attached details for more info',
    metadata: Metadata { internalRepr: [Map], options: {} }
  },
  transactionId: 'a92980d41eef1d6492d63acd5fbb6ef1db0f53252330ad28e548fedfdb9167fe'
}
*** Successfully caught the error:
endorse error: rpc error: code = Aborted desc = failed to endorse transaction, see attached details for more info
Details:
  - Address: peer0.org1.example.com:7051
    MspId: Org1MSP
    Message: chaincode response 500, the asset asset70 does not exist
TransactionID: 1cdfe852b0f32b30049f45d7f83d17761b329f6ceba87be0fc9a7dd5966fbf17
*** Successfully caught the error:
org.hyperledger.fabric.client.EndorseException: io.grpc.StatusRuntimeException: ABORTED: failed to endorse transaction, see attached details for more info
        at ...
Caused by: io.grpc.StatusRuntimeException: ABORTED: failed to endorse transaction, see attached details for more info
        at ...
Error details:
  - address: peer0.org1.example.com:7051
    mspId: Org1MSP
    message: chaincode response 500, the asset asset70 does not exist
Transaction ID: bb7e55f0790cd518d894c84d4f5b6757d247f99281a6fdb197fd8c65154c009b
The Endorse error type indicates that failure occurred during endorsement, and the
gRPC status code of ABORTED indicates that the
application successfully invoked the Fabric Gateway but that a failure occurred during the endorsement process. A gRPC
status code of UNAVAILABLE or DEADLINE_EXCEEDED would suggest that the Fabric Gateway was not reachable or a
timely response was not received so retrying the operation might be appropriate.
Clean up
When you are finished using the asset-transfer sample, you can bring down the test network using the network.sh
script.
./network.sh down
This command will bring down the certificate authorities, peers, and ordering nodes of the blockchain network that we created. Note that all of the data on the ledger will be lost. If you want to go through the tutorial again, you will start from a clean initial state.
Summary
You have now seen how to set up a blockchain network by launching the test network and deploying a smart contract. You have then run a client application, and examined the application code to understand how it uses the Fabric Gateway client API to query and update the ledger by connecting to a Fabric Gateway and invoking transaction functions on the deployed smart contract.